This morning I watched as bees from hive #1 went over to Schoolhouse hive #3 and helped themselves to "their" frame which was donated yesterday. Hive #3 has no defenses whatsoever, so on went the entrance reducer set to the smallest opening. Hopefully they don't get too hot in there. I did peek inside and saw that they are eagerly drinking from the feeder. No one hanging off the inner cover this time. I refuse to give up on this little hive. I think it can be saved... Hopefully. Which reminds me -
It really bothers me that I had a commercial bee supplier tell me to just combine this hive with another and forget about the queen (I happen to seriously value my queens). They said it isn't worth the effort and expense to try and build up the small hive - that we can just buy a new one in spring for the same amount.
What are your thoughts? Is this a valid argument? Am I being too sensitive? Or is this just a way to build springtime package sales?
Sunday, July 17, 2011
Saturday, July 16, 2011
Encouraging July 16 Inspection
| |||||||||||||||||||||
Wednesday, July 13, 2011
Hive #3 installed - mostly
The schoolhouse bees were so well behaved. They waited patiently in their styrofoam box through the night and this morning. I got up early to install them in the hive, before it warmed up enough for them to begin their day. After a light sugar water misting, I managed to secure two of their combs in a frame with rubber bands. The third comb was too damaged to wrangle into a frame, so I just put it in the hive with bees attached. I figure I will remove it in a day or two - I just wanted to get most of the bees inside the new hive. Comb #4 was too damaged and too small to deal with. Happily, I did see the queen on the second comb, so I know she survived yesterday's bombing and she is well inside the new hive. Hopefully this hive can get enough of a start before going into winter. I know I will be feeding them a lot, and will likely pull a frame of brood from hive #2 to help them increase their numbers.
I never imagined that beekeeping would be this fun and exciting!
Update - unfortunately I set up a robbing situation. I left the styrofoam box near the new hive so the rest of the bees would make their way into their new home. But unfortunately the other hives caught wind of the spilled honey still inside it. There are bees all over now... I guess I should go do something.
My 1st Beehive removal
There is at least one human on this earth that thinks I know what I am doing.... Here's the story.
 Last week I saw a post on the Wasatch Bee Keeping Association's FB page about a school in need of a Bee Keeper's help. They found that they had a beehive inside one of the vents at the school which was right next to a heavily used ramp, so the bees definitely had to go before school started. I called and left a message, but I really didn't think anything would come of it. On Monday, the principal of the school called and said no one else had offered to come out. So today, the kids and I took a ride out, not knowing what to expect or really even knowing how to remove a hive.
 It turns out the vent was positioned about 4 feet off the ground, and was about 1 foot high by 3-4 feet across, so plenty of room to work while planted firmly on the ground.
After applying some smoke, the custodian and I managed to get the cover and wire mesh off and reveal the hive right smack in the middle of the vent, and close to the front, so it was easily accessible.
It was a small hive, with 4 rows of comb, some brood and honey. I figure it was about the size of a mini-basketball for kids. The bees were calm while being uncovered. The poor custodian was a bit jumpy, and once the cover was off, he stayed well away, watching from a safe distance.

I figured that this shouldn't be too difficult, so I suited up and got to work.
First, I sprayed the bees and hive with sugar water to keep the bees from flying too much. This worked wonderfully. Most of the bees stayed put on the comb, and I was able to gently pull the first comb away without incident.
The rest of the combs had to be cut from the top, and to my surprise, this went smoothly as well. I did get sticky from dripping honey, but more importantly the bees were very accommodating during the move. I put the combs in a Styrofoam cooler (the one from the previous swarm), with as many bees as I could keep on them, and put the lid on - keeping it cracked enough for the bees to gain access. I did manage to find the queen wandering around in the vent (and what a fine looking queen she is), so I scooped her up and relocated her with the rest of the hive. With the queen in the cooler, the rest of the bees should readily follow her. I positioned the cooler on a chair next to the vent so the foraging bees would have a chance to rejoin the hive. It was windy, so I placed several rocks on top to keep the lid in place until I returned at dusk.
 At this point I am thinking this was too easy. All was going according to plan. No one got stung, No dramatic bee clouds. Combs removed and the bees were going where they are supposed to. A textbook case.
 So now I had a blown out cooler with a bunch of unhappy bees in it, that I was supposed to load into my car and drive home... and I forgot to bring a sheet to cover them with.
 Last week I saw a post on the Wasatch Bee Keeping Association's FB page about a school in need of a Bee Keeper's help. They found that they had a beehive inside one of the vents at the school which was right next to a heavily used ramp, so the bees definitely had to go before school started. I called and left a message, but I really didn't think anything would come of it. On Monday, the principal of the school called and said no one else had offered to come out. So today, the kids and I took a ride out, not knowing what to expect or really even knowing how to remove a hive.
After applying some smoke, the custodian and I managed to get the cover and wire mesh off and reveal the hive right smack in the middle of the vent, and close to the front, so it was easily accessible.
It was a small hive, with 4 rows of comb, some brood and honey. I figure it was about the size of a mini-basketball for kids. The bees were calm while being uncovered. The poor custodian was a bit jumpy, and once the cover was off, he stayed well away, watching from a safe distance.

I figured that this shouldn't be too difficult, so I suited up and got to work.
First, I sprayed the bees and hive with sugar water to keep the bees from flying too much. This worked wonderfully. Most of the bees stayed put on the comb, and I was able to gently pull the first comb away without incident.
The rest of the combs had to be cut from the top, and to my surprise, this went smoothly as well. I did get sticky from dripping honey, but more importantly the bees were very accommodating during the move. I put the combs in a Styrofoam cooler (the one from the previous swarm), with as many bees as I could keep on them, and put the lid on - keeping it cracked enough for the bees to gain access. I did manage to find the queen wandering around in the vent (and what a fine looking queen she is), so I scooped her up and relocated her with the rest of the hive. With the queen in the cooler, the rest of the bees should readily follow her. I positioned the cooler on a chair next to the vent so the foraging bees would have a chance to rejoin the hive. It was windy, so I placed several rocks on top to keep the lid in place until I returned at dusk.
 At this point I am thinking this was too easy. All was going according to plan. No one got stung, No dramatic bee clouds. Combs removed and the bees were going where they are supposed to. A textbook case.
So away we went. Off to visit some friends and have dinner while we waited for dusk. All was right with the world.
When we came back, all the bees indeed were inside the cooler (YIPPEE!), but something had happened to the cooler. The entire side of it was broken! As in a big chunk GONE. Either I loaded the top with too many rocks, or some clown came along and threw a big rock at it. (My guess is that someone was throwing rocks at the bees by the way the pieces were inside the box. The lid was not damaged). I really hope the queen wasn't killed or injured. What a shame it would be if something happened to her.
 So now I had a blown out cooler with a bunch of unhappy bees in it, that I was supposed to load into my car and drive home... and I forgot to bring a sheet to cover them with.
I ended up putting the gaping cooler (and bees) into the van and wrapped a sweater around the open end. To my amazement, it worked! The bees stayed nicely in their box, without complaint or fuss. They are now parked in their new location, waiting for final installation into the new hive tomorrow.
And that's the way it was... My first hive removal.


Here are some photos of the blown out cooler. I still think this is a really good idea. I will have to pick up another one to have on hand. It really does work well.

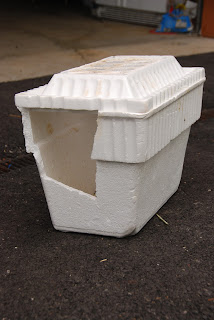

Here are some photos of the blown out cooler. I still think this is a really good idea. I will have to pick up another one to have on hand. It really does work well.


Saturday, July 9, 2011
Hive Inspection 7/9/2011
Hive # 1 - This hive is coming along, but slowly. There are 3 1/2 (or so) frames still undrawn, so it's probably about time to add a super. I was surprised to see how much capped brood was still in there. I would have figured it to have hatched by now as we are 28 days out from when I first saw eggs. The next week should be eventful. Saw some eggs, but not as many as I hoped, although there aren't a whole lot of cells available right now. Also saw some drone cells and a few cells that look sunken. I will consult BeeKeeping for Dummies as soon as I finish writing this to see what that might be about. It sort of looked like pollen being stored in recently hatched brood cells. Overall, I am happy to see this hive improving, but it still needs close attention. It certainly had a rough start. I will be adding another medium super today.
Hive #2 - WOW this hive is in high gear! The upper super is just about full, with three completely full frames of capped brood and at least two more frames of uncapped brood. The lower super is just beginning to get the bees attention and has good beginning stores of pollen and honey. I will stitch the boxes to get that one filled up, and I will add another super. I am very impressed with this swarm.
It's about time for me to do a mite count. Will do so within the next few days.
It's about time for me to do a mite count. Will do so within the next few days.
Saturday, July 2, 2011
Hive Inspection 7/2/2011
Hive #1 - Brood is beginning to hatch now. Saw larvae and some eggs, but comb building is still slow. Honey and pollen seems a little low too, but I am not sure. This hive has definitely been slow to get going.
Hive #2 - This hive looks to be progressing steadily. Most comb building has taken place in the upper box with about 4 frames already drawn. Honey and pollen looks good, and some eggs have been spotted today. I am pleased with how well this hive is doing.
Subscribe to:
Posts (Atom)